This past weekend, the Zine Librarian (un)Conference happened here in Iowa City! Amongst the lively discussions and seminars was a Historical Zine Making Technologies Workshop demonstrating and using obsolescent printing techniques including hectography, spirit duplication, and mimeography. You may be asking yourself, at this point, what the heck a hectograph is…and we’re here to show you. By the end of this post, you too, could be on your way to zine making madness!
First, a hectograph a.ka. a gelatin duplicator or jellygraph, is a smooth piece of gelatin used to make multiple prints off a single master sheet. We’ve got great examples in many of our zine collections, including, but not limited to the Hevelin collection.
Second, making and using is a hectograph is incredibly simple. The only difficulties I had in using this out-moded technology was locating a couple of the supplies. I recommend using internet shopping sites to track down the harder to find materials.
.
.
-
1 oz unflavored gelatin
- 6 oz liquid glycerin (sometimes in the first aid aisle of the drugstore or supermarket…most easily obtained online)
- about 1.5 cups of water
- a pan slightly larger than 8.5″ x 11″ – I used an aluminum disposable pan
- non-thermal transfer sheets (can be obtained from a tattoo supplier online, also referred to as Spirit transfer sheets)
- paper (of the plain white copier variety, but I encourage experimenting with other types of paper)
- optional: transfer stencil pencils (also purchased from a tattoo supplier online)
I got the recipe for the gelatin here.
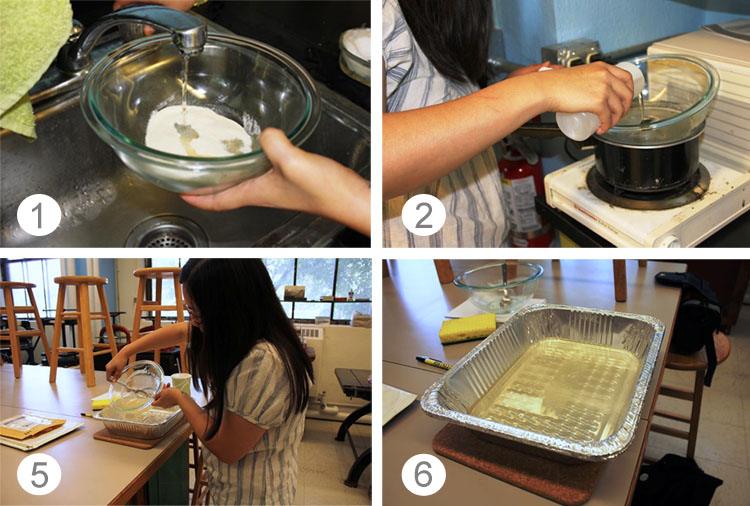
- Prior to beginning, pour the water over the gelatin and let it sit for a few hours (overnight is best)
- Heat the glycerin over medium/low heat – it just needs to be hot enough to melt the soaked gelatin
- Add the gelatin to the glycerin and gently stir until the gelatin is completely melted
- The mixture you end up with should be transparent and slightly yellow in color.
- Pour this mixture into the pan you want to print from – pour gently as to avoid making bubbles in the surface
- Let the pan sit and cool for a couple of hours until the gelatin has solidified…I got antsy and put the pan in the refrigerator for 20 minutes, which did the trick…
Printing
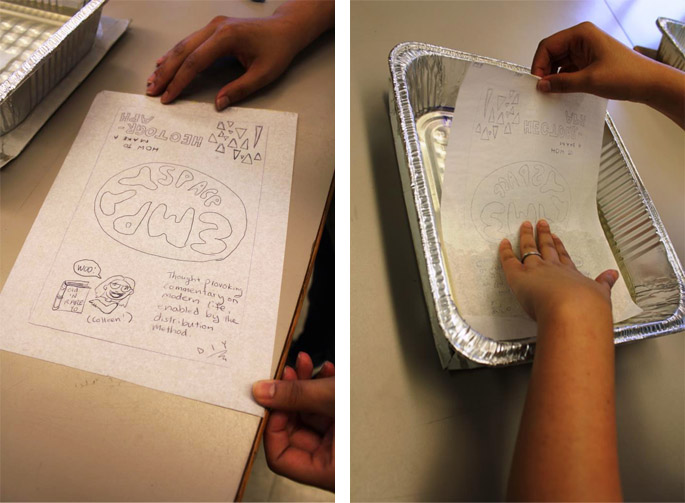
- Take your transfer paper and draw whatever you want to print on it with a firm hand and a hard stylus (a pen usually works). Make sure that your lines are being transferred to your master sheet. You can also use the transfer pencils to add designs directly to the master sheet.
- Take your master sheet and place it FACE down on the solidified gelatin surface, making sure there are no bubbles and that there’s good contact between the gelatin and the master. Let the master sit for awhile – I read somewhere that 1 second of sitting for every copy you want to make is a good rule of thumb.
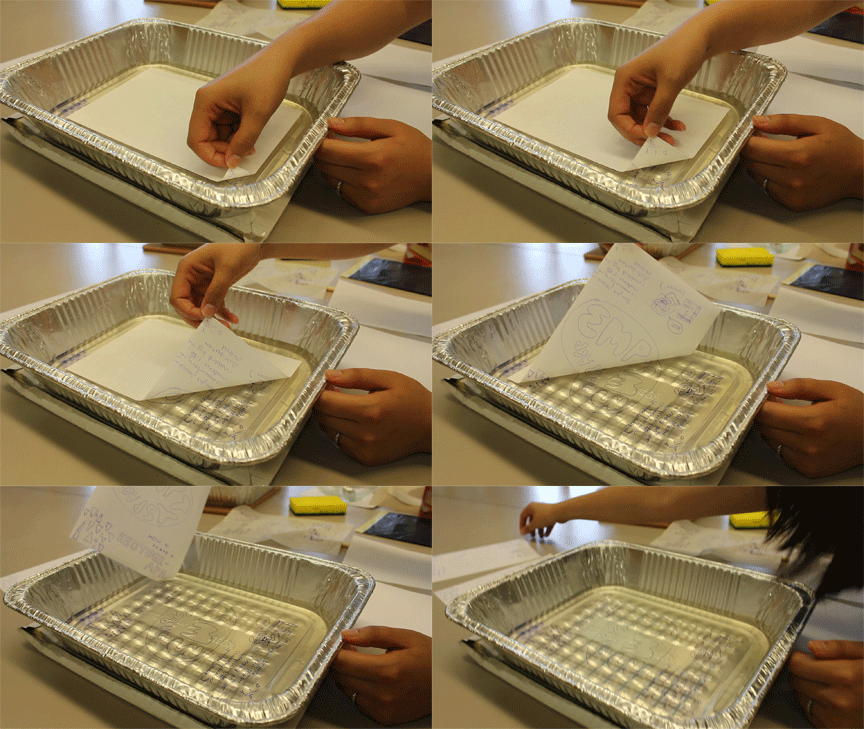
- Pull up your master sheet slowly – sometimes it helps to fold up a corner when placing it down so you have a tab to pull it up from
- You’re ready to print! Place your paper on the gelatin surface and rub the back, much like the master sheet. Pull the sheet up and voila – you should have a duplicate of your master!
- Keep going until the prints get too light to read.


Look at this awesome gif that Colleen made of pulling up a print off the hectograph here.


This is marvelous! Can agar stand in for the gelatin? I know some vegan zinesters who would rather not use a copying method that involves animal products.
I’m not sure if agar can stand in. As long as the gelatin-like texture is smooth and sturdy, I think it should work. Since agar tends to be a bit firmer than gelatin it might work quite well. I’ll definitely look into to it and post back.
It is amazing, I really do not know at all what it was called Hectograph. Interesting post Andrea Kohashi once, at least I understand the general idea of this technique.
I have fond memories of press-runs of “The Neighborhood Gossip” when I was in elementary school back in the 1950s. We set up the hectograph on my parents dining room table, where at least one fresh copy was accidentally set face down on the table, leaving a permanent imprint on the hardwood that is still faintly visible to this day. Commercial hectograph pans were very shallow, perhaps only 1/4 inch deep, and had close-fitting lids. After a press run, you’d warm the pan to melt the gelatine before reuse — this destroyed the previous image, and after a few cycles of use, the gelatine was a uniform (but non-printing) blue.
I would love to see a picture of the imprint off the paper on the table! I actually melted the gelatin down recently to reuse the pans and the gelatine turned a bit blue. I’m going to melt them down again for more prints – I wonder how many times the gelatin could be melted down before it would be over-saturated with ink. After use, I wipe down the gelatin with a wet sponge to keep it conditioned then cover with paper. I’ve been storing them with a piece of paper over the surface and I think that has helped to soak up some of the excess ink. I’ve heard that you can store the pan with the paper and eventually just print over what used to exist, but I’d rather have a fresh new surface and melt the gelatin down! It’s nice that they can be used over and over again. I’m thinking about investing in some wider shallow metal pans and making some more “permanent” hecto trays – I think 1/4 of an inch would be just fine with this gelatin.
I always assumed it was called a Hectograph after Hector, which means mocker, because you could express your views all over the place with flyers made this way. Every man his own printing press.
Very cool! I never knew about Hectographs! What a great project.