In the Preservation task of preparing journals for commercial binding, the work has always revolved around the “Sample Back.” Sample Backs are index cards that contain all pertinent information needed to bind a serial publication and keep track of its history. Sample Backs tell us the library in which the volume will be housed, the cover color the bindery should use, how often the journal is published, how often we bind it, and any changes in title. For years, Sample Backs were the best and only way to keep accurate records of the binding histories of journals, some of which have been continuously published for a century or more!
Then came the online library catalogs (cue scary music).
The University of Iowa Libraries have been using online catalogs for years, but in the case of serial publications have been reluctant to rely on them completely (one hiccup and you lose decades of materials!?!). Even in this digital age, Sample Backs remained the preferred option for keeping up with a title’s history…until now. In a combined effort with Selina Lin in the Cataloging-Metadata Department, Preservation’s Deb Miller has begun the task of entering all information not currently available in the online catalog into each serial title’s record. This makes all information needed to bind a title visible online. Once the record updating is complete, the sample back gets a purple marker across the front and a one way ticket to the recycle bin (after binding staff compares the catalog record to our commercial bindery’s database to verify that the information is complete). This process will be long, as there are thousands and thousands of titles and only so many hours in a work day.
Transferring information from the Sample Back to the online record? Tedious. Easier access and freedom from those little index cards? Priceless.
The Preservation and Conservation Department would like to welcome our newest staff member, Emily F. Shaw! Emily started on January 13, 2012 as our Digital Preservation Librarian. She comes to the University of Iowa from the University of Illinois, Urbana/Champaign, where she was most recently the Coordinator for Large-Scale Digitization. She brings with her a wealth of diverse experience in Digital Curation, as well as in hands-on Conservation treatment. Her first task is to review our digital policies, practices, and workflows and make recommendations for improvements. Emily is a great addition to our department, and we’re so excited that she’s here!
This treatment should be used with single section sewn or stapled pamphlet book structures. The materials needed for this treatment are:
Tools and materials needed for pamphlet binding.
Spine wrap pamphlet binder
pamphlet to be bound
3-5 binders’ awls
microspatula
binders’ needle
linen thread
scissors
bone folder
Preparing the pamphlet for binding
Removing the staples
1. Using either a staple remover or microspatula, remove the staples from the pamphlet.
2. Insert the pamphlet into the pamphlet binder, ensuring that it is centered properly between the head (top) and tail (bottom) and that the front cover of the pamphlet is showing through the transparent front cover of the binder.
Removing the staples
3. Fold the binder’s adhesive spine cloth so that it is out of the way.For small pamphlets, three sewing stations will be adequate. Forlarger pamphlets, additional sewing stations may be necessary. As a rule, there should be no more than 2 inches between each sewing station. For this pamphlet, 5 sewing stations are needed.
Piercing the sewing stations
4. Working from inside of the pamphlet and using the binders’ awl, pierce a hole, or sewing station, through the spine, roughly halfway between the head and tail. Leave the awl in the sewing station to keep the pages aligned. When piercing the pamphlet, it is best to work on the edge of your table or workstation.
Leaving the awls in place helps to keep the pages aligned
5. Pierce sewing stations roughly ½ inch from both the head and tail of the pamphlet. For small pamphlets, three sewing stations will be adequate. For larger pamphlets, additional sewing stations may be necessary. As a rule, there should be no more than 2 inches between each sewing station. For this pamphlet, 5 sewing stations are needed.
6. Pierce additional sewing stations roughly halfway between the center station and the head station, and about halfway between the center and the tail.
Sewing the pamphlet
Sewing Diagram for Pamphlet StitchBeginning the pamphlet stitch
1. In order to sew the pamphlet, you will need roughly 2½ spine lengths of linen thread.
2. Cut the required length of linen thread and thread the needle. It may be helpful to use the bone folder to flatten the end of the thread.
3. Beginning outside the pamphlet at the center sewing station (#3). Thread your needle into the sewing station leaving a 2-inch length of thread outside of the spine. This will be used to tie off the stitch in the final steps.
4. Working toward the head of the pamphlet, sew through the next station (#2) moving from the inside out.
Keep the stitching tight as you work
5. Next, sew through the head station (#1) moving from the outside in. Holding the beginning end of the thread in place, pull the stitching tight.
6. Working back toward the center now, sew through station #2, this time sewing in the opposite direction as before, from the outside in.
Beginning and ending thread lengths
7. Next, move past the center station toward the tail of the pamphlet and sew into station #4.
8. Sew through station #5 and back through station #4. Keep the stitching pulled tight as you work.
9. Next, sew through the center sewing station (#3). As you push the needle through, make sure that the beginning and ending thread lengths are on opposite sides of the thread that runs from stations #2 to #4. Using the beginning thread length and the ending thread length, tie a square knot.
10. Trim the beginning and ending thread lengths to roughly ½ inch.
11. Remove the wax paper strip from the binder’s adhesive spine cover and adhere the flap around the spine. Seal securely with the bone folder.
Vietnam Institute of Oceanography started in 1922 as “Service Océanographiques des Pêches de l’Indochine and specializes in oceanography of Vietnam. One of the special collections is the records of the Expedition of Cooperation of Vietnam and China in Tonkin Gulf, 1959-1961. So far these records are in good condition.
These records along with other rare publications are stored on the second floor without good temperature, humidity control, and air circulation. Staff will be requesting the addition of a ceiling fan to improve air circulation. In our final meeting with library and institute staff, we discussed the possibility of making a formal proposal for a special room to house these materials. As always, money is an issue and electricity is expensive. We will be exploring ways to find a better environment for these rare materials. We will be working with VNIO staff to draft plans for improving the storage conditions for the entire collection. Our visit was just the beginning.
Ms. Yen, Librarian for the Vietnam Institute of Oceanography, needs to make the most of her limited resources. Here she has designed a simple protector for a fragile map. She used a poster, turned it over to the back side and made corners to hold the map in place. Maybe some day she will be able to give the map an archival folder. Until then the map can now be handled safely.
Today we visited the National Archives Center IV in Dalat, Vietnam. This visit was in sharp contrast to our visit to the Vietnam Institute of Oceanography. Our visit with the VNIO was quite causal and informal. Today’s meeting was very formal, complete with speeches, a gift, and several photo sessions. Linda Pikula and I were greeted by Ms. Pham Thi Hue and her interpreter, Ms. Le Thi Lan.
After giving a brief history of the archives and an explanation of preservation methods, we were given a tour of the archives. All was quite modern with excellent shelving, smoke alarms, and fire suppresant system. One interesting thing of note is that they run the fans for the air-conditioning system but not the cooling. Temperature is kept at 21 degrees Celsius or 70 degrees Fahrenheit and humidity is around 60-70%.
Their documents are repaired by lining the pages with handmade paper and attaching the paper with cacboxyl methyl cellulose glue. In addtion to their documentary collection, they also have a large woodblock collection of the Nguyen dynasty. Just think — the characters needed to be carved in the reverse in order to print on paper. The wood block below illustrates a title page.
Today we worked with the rare books. Two years ago Yen prepared a list of rare books for review. Both Linda and Yen checked different sources to determine how widely the titles were held and if they have been digitized. From this list we selected only three titles (20 volumes) to inspect, given our time limitations. As a gift to the Vietnam Institute of Oceanography library, the University of Iowa Libraries plans to make boxes for these select titles. I just hope my measurements are accurate.
Each book had to be measured in several places to find the highest, widest deepest part in order to know how large to make each box. I decided to err on too big rather than too small. Plus, we decided with the 14 volume set to make all the boxes the same height and width and just adjust the depth — a shortcut that we probably wouldn’t take if we were working in a lab. We checked the measurements twice and Linda recorded the information.
The books were in mixed condition. All bindings had extensive damage. Most of the volumes had intact legible text except for one extremely brittle book. Fortunately, the brittle book is held by two other libraries and has been digitized.
Linda Pikula and I met with Yen and Van to discuss preservation and possible digitization of select portions of their library collection at the Vietnamese Institute of Oceanography Library. The biggest challenge is that the library is quite close to the ocean where ships dock. These ships bring in a lot of dust and pollutants which end up on the books. Airconditioning is too expensive and the heat and humidity is a challenge. Humidity ranges from 50-85% and temperature ranges from 70-108F degrees. To keep the area reasonably cooled they keep the windows open (when it’s not raining!). The windows are across from each other so they do get a good cross breeze.
The good news is that I saw no evidence of mold (fungi). But we do want to reduce risk of mold and insect damage. First simple solution that comes to mind is to install ceiling fans that can be kept running during the day to help keep good air circulation and to cover the windows with a sheer curtain to cut down on pollutants and dust while still allowing good air circulation. I was assured that these two suggestions are within their budget.
Our trip is sponsored by the Intergovernmental Oceanographic Data and Information Exchange (UNESCO, IOC) and their OceanTeacher Program.
Illustration of sheer curtain material that could be used for window treatmentWindow in library
We had a small pipe leak and were lucky that it happened in the day. We covered the books with plastic and were able to shut the water off quickly. Jessica Rogers and Cassandra Elton wiped the shelves, including the lip, starting from the top and working to the bottom. If the cover wasn’t very wet, they wiped the book off and then turned the spine down so the edges could be exposed and air dried. If the pages were wet into the book and not just damp to the touch, the book was taken to our book freeze dryer. As a precaution, we set a fan to blow air into the stacks to wick up any moisture we might have missed.
We have been working on many projects for various museums that got hit by the flood of 2008. Remember the entry way back on December 18 of 2009? We may have sounded elated about our accomplishments then, but now we are for sure! We have finally finished the rest of the flood-damaged phonograph records.
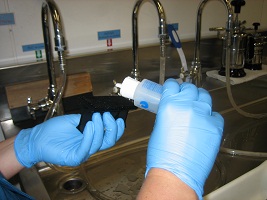
Cleaning the record.Applying Disc Doctor cleaning supply to record cleaning device.
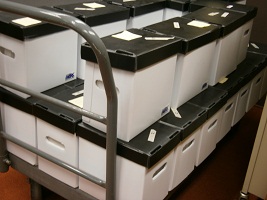
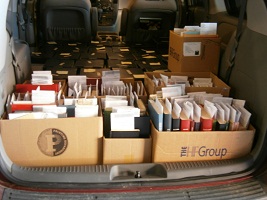
All 1580 10-inch LPs and 78 rpms were thoroughly cleaned, sleeved and boxed. We are estimating that this process took at least 400 hours. These records were returned to The National Czech& Slovak Museum within 30 boxes.
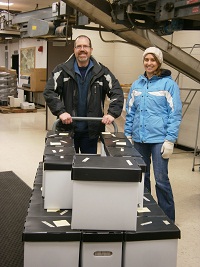
Dave and Katie retrieving the records at the library.The records and books packed up and on their way to Cedar Rapids.