Skip to content
Skip to main content

A New Conservation Lab Sink at Last

Friday, September 11, 2009

Blog DSCN0612Blog IMG_0929

Finally, all the pieces are in place and fully functional! I thought it would be good to reflect back on the old system on the left and ponder the new system on the right.

The stainless steel sink is 48” x 72” x 4” allowing for work on large and small items. The water system includes a water softener, carbon filter, storage and exchange tanks, a UV light to continually disinfect the constantly circulating water, water purification system, de-ionizer, and water heater.

And, last but not least, we installed a water alarm system that is tied 24/7 to the university security system.

Blue Boxes

Wednesday, September 9, 2009

Volunteer measuring blue corrugated board to make a boxVolunteer with blue boxes completed and one in progress

One of our volunteers has taken on the project of building custom boxes for objects to be returned to the African American Museum in November. Beth has been teaching Kallie Holt how to make boxes from the sturdy blue corrugated board we use routinely in the conservation lab.  In addition to making them easily transportable the boxes will be good for long term storage for these artifacts.

One of the advantages of our close communication with the curators is the ability to have us prioritize items. Susan Kuecker of the African American Museum is opening an exhibit in November and sent us a list of objects she needed so we could re-arrange our workflow. These are the objects that Kallie is re-boxing.  We hope to have a majority of the items from the African American Museum treated, boxed, and ready to go by December.

Paper to Digital to Paper Again

Wednesday, August 26, 2009

     A UI prof and grad student were interested in getting a digital copy of Cursus Literaturae Sinicae, a 19th C. translation of classical Chinese texts into Latin in five volumes.  When the volumes came via ILL from Notre Dame, they were scanned using the overhead scanner with the gradation curve set to give as white a background as possible, since it was determined that we should also print out a copy of the scans and bind them for our own circulating collection.  Here’s what they look like.

     The sheets from the printer were perfect bound with the double fan press.  To account for the swelling in such large volumes we decided the backs should be rounded, which was accomplished with the aid of a couple of cardboard map tubes at the fore edge.


For the first volume (at left above) only three spine linings were used: kozo, acrylic/cotton super, paper.  As this volume had a lot of throw up, subsequent volumes got additional linings: kozo/cotton super/paper/cotton/paper, which worked better.  Hopefully they will stand up well to frequent use.

Mock Disaster Recovery Drill at the Iowa State Fair

Sunday, August 23, 2009

Today the University of Iowa Collections Coalition http://www.uiowa.edu/collect/ went to the Iowa State Fair. We staged mock disaster recovery drills from 9AM until 3PM. Our message was that there is a strong likelihood that you can save your stuff even if it’s all grimy and wet. We invited people to participate. Several kids stepped up to the plate while the adults watched and listened. A few commented that they “wished they had known about this last year.”

It was messy but fun. We had one “pool” of muddy water and separate buckets for dunking books and photos and CDs. The books had had it by the end of the day from all the endless dunking and sometimes less than gentle treatment from participants. The photographs and CDs were still intact as were all the fake bugs and snakes thrown in for a little drama.

In addition to participating in the drill, kids lined up for a free tatoo.

Adherograph Reformatting Continues

Monday, August 3, 2009

Ongoing efforts to clean and flatten flood-affected archives manuscripts from the African American Museum of Iowa have turned up yet another form of adherograph deterioration. (See June 30, 2009 entry)

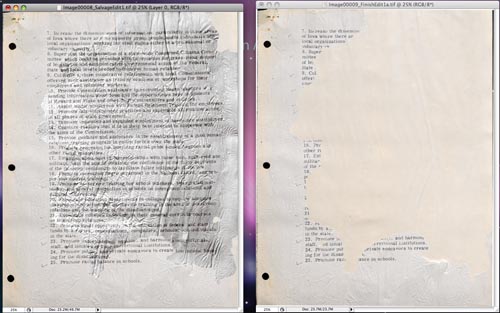
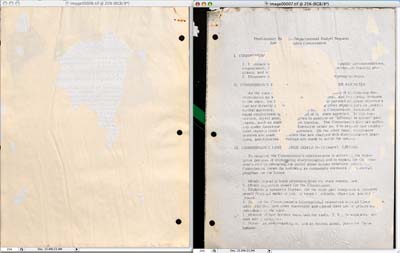
As seen in the example to the left, the powder medium that holds the adherograph text image has irreversibly adhered to the back of a preceding document page.  Unable to separate the two, I decided to scan both pieces of the damaged document and then attempt to reunite them in Photoshop.

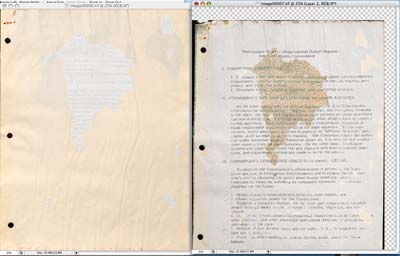
The first step was to flip the fragment horizontally.  Though only the back of the reversed fragment text was visible through the adherograph medium, flipping it over digitally created a faint, though workable positive. 

Note the altered color of the reunited fragment.  Through a haphazard process of tweaking color levels and saturations I was able to pull the text out, making it as legible as possible.  After doing so, reducing the image from color to black and white serves to isolate the information from the discolored document carrier.

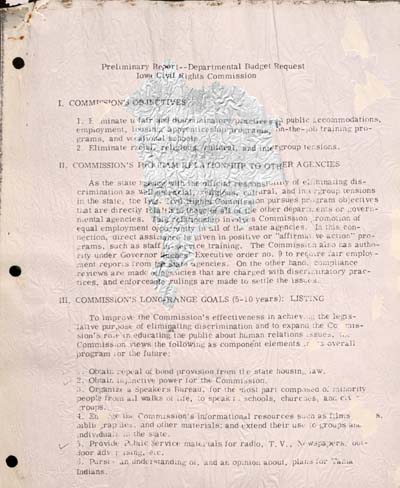
 This detail, captured after converting document to black and white, shows that while the texture of the adherograph medium remains cumbersome, the information is again legible. 

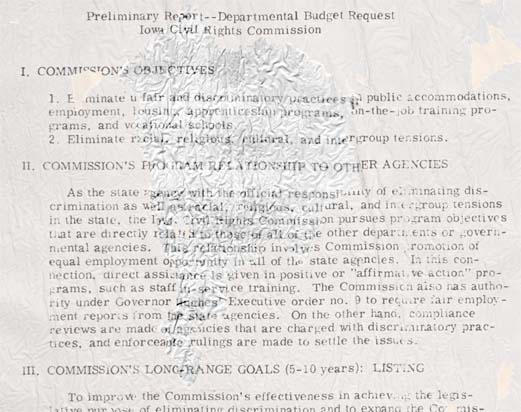
This second example details another completed document as well as its original post-flood condition.  While this process is probably too time consuming in many situations, experimenting with the procedure was a valuable experience.  Not only is there now a workflow for this in the future, but it also raises some interesting questions about disaster recovery, institutional resources, and policies pertaining to discarding and reformatting.

Marriage Certificate Repaired

Thursday, July 23, 2009


This Marriage Certificate arrived at the Conservation Lab tightly rolled in a tube. It was in two torn halves, somewhat soiled and quite tattered along the edges with some degree of loss particularly along the right margin.

The treatment that followed included a gentle humidification and flattening, followed by dry cleaning using Minter eraser crumbs and Absorbene sponge eraser. Kristin secured strategic bridge mends of tenjugo along the major tear to insure proper matching of scarfed edges, and then lined the entire certificate onto a medium-lightweight Korean handmade paper. The lining enforced an additional gentle flattening of the certificate and countered it’s tendency to curl.

Once the lining was dry and the certificate flat, Kristin createdcustom-tinted double layer/sandwich infills for areas of loss. A thicker more fibrous paper was used for the bulk of the infills (to echo the thickness of the certificate) and was thin sekishu-gampi was then adhere along the top of the infill (to echo the calendared sheen of the original paper). Custom color tinting was achieved post-mends, using acrylics and a “dry-swab” technique.


Text provided by Kristin A Baum.

Yet another workflow…

Sunday, July 19, 2009

stack of flattened books next to one not yet flattened This weekend I’ve started working with the Johnson County Historical Society book collection. So far they have required some dry cleaning, mending and flattening. I’ve been using the vacuum packer to flatten them which has been very effective and is really fun to watch. The damage is similar to that of the ledgers but since the books are smaller it goes a little faster. We still have a yearbook collection and the rest of the ledgers to do so I’m not going to run out of books anytime soon!

vacuum pack machine book encased in plastic after vacuum packing

Adventures with the warp eliminating vacuum…not Star Trek

Thursday, July 16, 2009

 
We have been experimenting with a fancy new vacuum packer, generally used for food preservation. We are using it to flatten books and other paper items. It would be inefficient for batch work because of all the material that needs to be cut to size but for especially warped books it is very effective. 

We cut blotter pieces, card, and book board all to size.  All of the interleaving material must be cut to the size of the book so that the edges don’t interfere with the sealing of the bag. The inside of the book is lightly misted, and the blotter sheets placed inside.  The book is sandwiched between pieces of blotter, card, and book board.  Rubber bands hold the stack together. The stack is then placed inside a special plastic bag. 


When an item is placed in the vacuum sealer, all the air is sucked out of the bag and it is sealed closed. During this process the moisture from the pages is drawn into the dry blotter between the pages. The pages, which were relaxed by the moisture, are drawn flat by the pressure. We generally leave a book in the sealed bag overnight. Ideally, we open it the next day and the book is perfectly flat.

Return to Sender: Reattaching Stamps

Monday, July 13, 2009

Many of the files from the African American Museum contain various forms of correspondence. There are many postcards and letters with their original stamps. When these already fragile envelopes were faced with the flood, the stamps detached to end in a pile at the bottom of the file folder.

The second project I gave Kallie was to reunite the stamps with their respective letters and postcards. This was a fun project because it’s like putting together a puzzle and some of the stamps are pretty interesting. I had her reattach the stamps using wheat starch paste applied with a small brush. When the stamp was in position, a small square of blotter was placed over it and weighted to absorb any excess moisture and prevent warping.

Volunteer Kallie Making a Difference

Friday, July 10, 2009

We have a new  volunteer! Kallie Holt, a Junior at the University of Iowa has volunteered to work 8 hours a week here in the Conservation Lab.

The first project I gave her was the cleaning of a collection of small miscellaneous items from the African American Museum. These objects range from pacemakers to a wooden gavel and everything in between. Most of the collection belonged to a medical doctor, hence the medical paraphernalia and miniature lungs which you can see at the bottom of the photo on the right.  Creepy.